OCS Onboarding
Technical Documentation
1) System Setup
1.1. Install Vs Code
1.2. Install NoSql Booster
Create a folder “AppImages” and Save the downloaded appImage in it.
Open your terminal and run the below command -
Cd /<pathOf”AppImages”Folder>
chmod a+x nosqlbooster4mongo\*.AppImage
1.3. Install Node.js
Step 1: Open Terminal and run below command
sudo apt install nodejsStep 2: Once installed, verify it by checking the installed version using the following command:
node -v or node –versionStep 3: install NPM, use the following commands:
sudo apt install npm
npm -v or npm –version1.3.1. Install NVM
Step 1:
curl -o- https://raw.githubusercontent.com/nvm-sh/nvm/v0.39.1/install.sh | bashThis command downloads and runs the NVM installation script. The version number in the URL may change over time, so it's a good idea to check the official NVM repository for the latest version.
Step 2: Close and reopen your terminal, or run the following command to apply the changes:
source ~/.bashrcVerify that NVM is installed by running:
nvm --versionThis should display the installed version of NVM.
Note - Refer the below link to install/setup the node version(14.17.6) https://www.digitalocean.com/community/tutorials/how-to-install-node-js-on-ubuntu-20-04
Video: Node|NPM|NVM Installation
1.4. Install Docker
What is Docker ?
Docker is a platform that enables the creation, deployment, and execution of applications in lightweight, isolated containers. A container is a standalone, executable software package that includes everything needed to run a piece of software, including the code, runtime, libraries, and system tools.
Why use Docker for databases like MongoDB, Redis, and RabbitMQ?
Databases often have specific dependencies, configurations, and versions that need to be maintained for an application to function correctly. Docker allows the creation of containerized instances of these databases, ensuring that each application has its isolated environment. This eliminates potential conflicts with host system dependencies and allows developers to easily switch between different versions or instances of databases.
Now open the terminal and follow the below steps -
- Step 1:
sudo apt update - Step 2:
sudo apt install -y apt-transport-https ca-certificates curl software-properties-common - Step 3:
curl -fsSL https://download.docker.com/linux/ubuntu/gpg | sudo gpg --dearmor -o /usr/share/keyrings/docker-archive-keyring.gpg - Step 4:
echo "deb [signed-by=/usr/share/keyrings/docker-archive-keyring.gpg] https://download.docker.com/linux/ubuntu $(lsb\_release -cs) stable" | sudo tee /etc/apt/sources.list.d/docker.list > /dev/null - Step 5:
sudo apt update - Step 6:
sudo apt install -y docker-ce docker-ce-cli containerd.io - Step 7:
sudo docker run hello-world
Video: Docker Installation
1.5. Setup Mongo
prerequisite - you will require a dump database from devops
Step 1:
sudo docker run --memory='1g' -d --name mongoDB -v /path/to/your/local/database/directory:/data/db -p 27017:27017 mongo:3.6 --auth
e.g (sudo docker run --memory='1g' -d --name mongoDB -v /Documents/mongo-data-new:/data/db -p 27017:27017 mongo:3.6 --auth)Video:
Setting up mongodb
Creating and Run mongoDb Container
Step 2: Create a create_user.js file
  use admin
  db.createUser(
  {
      user: "root",
      pwd: "mischief_managed",
      roles:  [ { role: "root", db: "admin" },{role: "clusterAdmin", db: "admin"}]
      }
  )

  db.getSiblingDB("admin").auth("root", "mischief_managed")

use oriserveDemoDBdb.createUser({ user: "dbOwner", pwd: "expecto_patronum", roles: [{"role":"dbOwner","db":"oriserveDemoDB"}]})Step 3:
sudo docker exec -i mongoDB mongo < /path/to/where/you/saved/create\_user.jsVideo:creating Db creds
Step 4:
mongorestore -v -h 127.0.0.1:27017 -u root -p ${NewDBRootPassword} --authenticationDatabase admin -d ${NewDBName} --dir ./${dumpDBName}/ --gzip --drop –E.g. -(mongorestore -v -h 127.0.0.1:27017 -u root -p mischief_managed --authenticationDatabase admin -d oriserveDemoDB --dir ./oriserveDemoDB/ --gzip --drop)
Video:Restoring Db locally
1.6. Connecting Database to NoSqlBooster
Refer to Video
1.7. Setup Redis || RabbitMq
sudo docker run --name redis -p 6379:6379 -d redis redis-server --requirepass redispasssudo docker run -d --hostname rabbitDemo --name rabbitDemo -e RABBITMQ\_DEFAULT\_USER=demorabbitori -e RABBITMQ\_DEFAULT\_PASS=kmVng7CGzCKZXuivFwhIKirViHTNQ1\_c -p 5672:5672 -p 15672:15672 rabbitmq:3-management
Video: Link
Basic Linux Commands to know -Refer
2) Devops Access
2.1) Mail Devops in below format to get access for the repos.
Hi Team,
I need read/write access to the following repositories:
1. OCS
2. brand-files
3. chatbot-2.0
4. chatbot-dashboard
5. chatbot-dashboard-2.0
6. user-management
7. Scheduler<
Team: Backend Team
Reason: Internship
2.2) env - click here
2.3) Branch
OCS- intern-demo-OCS
Brand-files - intern-demo-BF
Chatbot2.0 - intern-development-master
3) Local Setup
As you’ve access to all the above mentioned repos, Let’s Get Started -
3.1. Repositories Cloning
Generate system ssh key using below command
ssh-keygen
Then keep pressing “enter tab”cat ~/.ssh/id\_rsa.pubLogin in to bitbucket with your official Id and follow the steps shows in the below video.
ssh config in bitbucketClone the repos as notes below -Video
-OCS
-Brand-files Clone “brand-files” under “Brainservice” of “OCS”
-Chatbot2.0
-Chatbot-dashboard
-Chatbot-dashboard-2.0
-User-management
Create a .env file under oriserve-communication-service and paste the env mentioned under 2.2 in it. Please change the the following in env -
SERVER_URL="http://localhost:8080"
cacheNLPResponse='true'
CS_REDIS_URL=
CS_DB_URL=
CS_DB_USERNAME=
CS_DB_PASSWORD=
CS_DB_NAME =Checkout OCS, Brand-files to the branches as mentioned above.
npm i
3.2. Connection of Chatbot with OCS
Setting up the OCS URL inside Chatbot-2.0
- Inside Chatbot open urls.js
- Path: chatbot-2.0/src/data/config/urls.js
- Change the socketUrl path to
http://localhost:8080/liveConversations
3.3. Run Chatbot and OCS Check if local environment is set up by running both Chatbot and OCS
- Any message from Chatbot should be displayed on the console of OCS
- Equivalent response to be delivered in Chatbot as well
3.4. Creating your dashboard login password -
- Go to db and “adminusers” collections and insert a new document.
- In the new document, change the "firstName", "lastName", "email".
- Start your dashboard 2.0 locally and click on “forgot password”.
- Type in your mail id which you added in the db document.
- You will receive password reset mail on your same mail id.
3.5. Start Chatbot-Dashboard locally -
- Open chatbot_dashboard in VS Code.
- Checkout to the mentioned branch
- Go to Path: chatbot-dashboard/src/data/urls.js
And make the following changes -const BASE\_URL\_USERS = 'http://localhost:8087/';const BASE\_URL = 'http://localhost:8080/';const BASE\_SOCKET\_URL = 'http://localhost:8080/';
4) Files Structure Codewise(OCS)
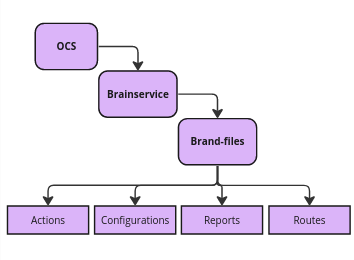
4.1. OCS: The Ori-Communication-Service serves as the foundational platform encompassing both brand-specific files and standardized files/components, including essential functions that facilitate the connection, execution, and operation of the chatbot system.
4.2. Brainservice: Brainservice, as the name suggests, can be referred to as the “Brain of OCS”. It contains all the Brand-Specific functionalities and configurations. Its primary role involves transferring control to the brand level, serving as the central hub for managing and executing brand-specific operations within the OCS architecture.
4.3. Brand-files: This differs depending on brand.
- Actions: This folder contains files like “brand-actions.js” where the code for brand functions is written, “api_calls.js” .
- Configurations: Under this, “constants.js” contains functions and mappings that remain static, serving as constants throughout the system. These constants can be seamlessly employed across various files by importing them as needed, aligning with specific use cases. Also, “api_layouts.js” are written here.
5) Bot Builder(on Dashboard)
5.1. Workflows - These are used to build/design the chatbot flow as per requirements.
- Step 1: click on “add workflow” in the top right corner and create a new workflow with the name of your choice.
- Step 2: Refresh the page and click on the workflow you just created. You’ll already get one node by default.
- Step 3: Edit node and enter the edge variable, action specific to the functionality of the node. You can similarly create and attach further nodes or add another workflow as well. Note - Make sure to reset the node & message variable at the edge of each node.
5.2. Intents - Intents help chatbot know what the users want.
- Step 1: click on “add intent” in the top right corner and create a new intent with the name as required DON’T FORGET TO TURN ON THE STATUS and click on “create”.
- Step 2: Refresh the page and search the intent you just created and click on edit icon.
- Step 3: Add utterances for this intent. You can attach any workflow to this intent, reset the variables of the attached workflow at intent level. Some intents can also be created to display static messages. To do so , “message before” can be attached at intent level.
5.3. Bot Messages - As the name suggests, these are the messages displayed on chatbot to the end user. Apart from creating messages from dashboard, there are two other ways as well -
- with the help of custom_message_doc (code level)
- Inserting message from DB (inserting document in messages collection)
Note - Refer to the knowledge base to see the message type that can be created.
5.4. Bot Params - Variables that are attached to messages and workflow as node variables are created here.
5.5. Brand functions -
- Step 1: click on Add New button then write function Name and Description.
- Step 2: After creating a function make sure to make it status "Active".
- Step 3: After creating brand function, go to edit button of node in workflow and there in "Action" dropdown select your brand function name you want to connect with that node.
- Step 4: After creating brand function through dashboard, write it's code in brand-action.js
Video: how to build a demo workflow using bot builder
6)How to write a function codewise
    const getNameFromUser =  async(socket, session_doc, ongoing_intent_doc, node_doc, action_parameter, callback) {
    try{
        let name = session_doc.context_variables.getName ? session_doc.context_variables.getName : null;
        if(!name){
            session_doc = await genAndSendResponse(socket, session_doc, 'response', '6368ac3b21a65a159d23339a');
            return;
            }
        else{
            session_doc = await update_entities_in_db_without_check(session_doc, {
                userEnterName : name,
                proceedToNextNode : 'yes'})
            return callback(null, socket, session_doc);
            }
        }

    catch(err){
        let {metadata,ship,log} = getMetaData(session_doc, node_doc, 'catch');
        err.scope =  err?.scope ?? 'getNameFromUser'handleAppError({err, metadata, ship, log})
        return callback('error occurred in getNameFromUser', socket, session_doc);
        }
    }
Declaring a variable
let name = session_doc.context_variables.getName ? session_doc.context_variables.getName : null;This is the same variable as the variable attached to the message you want to display on the node. This variable stores the value typed/selected by the user. Remember, You need to empty this variable at the edge of node.
Sending Message
session_doc = await genAndSendResponse(socket, session_doc, 'response', '6368ac3b21a65a159d23339a');
genAndSendResponse is a function written in OCS/helpers/socket-functions.js This function’s use is to check and validate the id and if it exists in db or custom_doc, it is send to the user on chatbot.
- Update Variable Value In DB
session_doc = await update_entities_in_db_without_check(session_doc, {input_variable : valueproceedToNextNode : 'yes'})
For the proper functioning and workflow bot have to save variable data in Db. This is the function which can stores value in DB.
7) Database Structure
There are some important database collections we need to use in your workflow building process. Let us know about them:
Intents - This collection stores all the intents created at either dashboard or by DB. You can edit, insert/delete documents. You can add relay data like workflow, node id, message before, etc at an intent from db collection document.
CacheNLPResponse - Firstly let us understand NPL. It stands for Natural Language Processing. In the context of chatbots, NLP aids in user input understanding, intent and entity recognition, context management, and response generation, creating a more natural and engaging interaction. NLP enhances the overall user experience by making chatbot conversations more intuitive and user-friendly. Buttons/Texts that are not supposed to be detected by AI or are to be mapped to any intent or "none" are inserted as a document in cacheNLPResponse.
Messages - This collection stores all the message documents. Each document has a unique message id. Documents store the message type such as text, text_with_buttons, carousel, etc; texts displayed to the user, language types variations,etc. Messages that are “custom_message_doc” type are not stored in the messages collection. Note - refer to knowledge base to study the message and button types in detail.
Chat_session - This collection stores all the information about the session of the user bot journey until the user end’s chat or the session expires due to user's inactivity. sessionId is the primary key(unique identifier) of each document in this collection. Each Document stores the psid, platformName, context_variables that stores all the user entered info during the bot flow journey, etc.
BSV - Brand_Specified_Values collection has documents based on env namely dev and prod. Please refer to knowledge base to study in detail
8) How to Test a flow locally
VS code has “javascript debugger terminal” feature which helps you debug your code, check error logs in terminal and fix them simultaneously.
Please refer to the video to see how you can debug your code and test your workflow locally
9) Working of a Chatbot
Now that you have seen how a workflow is build, written, and tested. Let’s see how the whole system actually works, i.e, how the control enters ori-communication-system when a user sends a message or enters a workflow journey on chatbot.